Cindy Walker
Independent Stampin' Up! Demonstrator
919-585-6667


Monday, August 20, 2012

Christmas Card Buffet

Christmas Card Buffet

Aren't food buffets wonderful, you go up and down the line and pick out what you want to eat. If you are still hungry you go back.  Well let's have a Christmas Card Buffet. 

Here is how it is going to work:
7 Cards for $10
I will design 9 or 10 cards and about 4 or 5 Christmas Tags. I will cut supplies for 12  of each design.   I will put supplies for each card in a clear shoebox with a sample card on top. 
You  pick a card and shoebox and make one or more of that card, and repeat-- til you get your 7 cards made.
If you want to make more, it will be $1.50 for any extra cards that you want to make. 
Note, you can make 7 of the same design or 7 different ones, it is up to you.  But because this is a buffet, just like the food may run out the card pack may run out too, so it is first come first serve. 

When - Saturday September 1st starting at 1 and ending at 4.  Please give me a call if you plan on attending. 

Christmas Ornament

Would you like to make the Christmas Ornament that is shown on the cover of the Holiday Catalog.  I will be holding a class (you pick the date).  I will supply all of the materials, you just bring your adhesive, bone folder, paper snips and glue gun.

Class price $15 (we will make 3 ornaments)
Purchase the Holiday Keepsakes Bundle which includes the stamp set and the framelets and receive the class free.

Holiday Catalog

MARK YOUR CALENDARS - Card Club & Shoebox Swap

Time to mark your calendars.

Card Club is Friday 9/14 at 1 p.m. and 6 p.m.  Please let me know which time you plan to come.

Shoebox Swap is Saturday at 1 p.m. on September 22.  For those that don't know the rules, here they are:

A shoebox swap is where you bring one full card (not a card front) or project which will be made ahead and all supplies (pre-cut and ready to assemble), stamps, inks, tools, etc., needed to make the other cards. Each person sets up their station for stampers to be able to make your card, and after you have set up you go to the other stations and make those cards. The number you make depends on how many are going to attend. I will send that information out when the event registration ends. RSVP's will end 5 days before the swap so you have time to prepare your swap.

JUST A REMINDER, ALWAYS BRING YOUR PAPER CUTTER, SCISSORS, ADHESIVE, SCOREPAD (IF YOU HAVE ONE) TO ALL EVENTS.  If you don't have a paper cutter, or scorepad it is ok we will share with you.  I always have several embossing guns if we are embossing.

Saturday, August 18, 2012

August Shoebox Swap

Shoe Box Swap August - As usual Candee wrote up a good review of our swap, so I am going to just paste her blog here.  Thanks Candee, we all love you and thanks for all the show and tell you brought for us along with the Snowman Boop.

Today was our 4th Shoe Box Swap with our regular stamp club leader Cindy W... and as usual it was great! We have four new people that are coming now and for a couple of them this was their first Shoe Box Swap and we all had a good time -- GREAT cards to come home with also ---


This first photo is 3 of the cards we made -- the bee on the left is too cute and he is on a home-made spring so he wiggles and that card is all layers. The card base has an embossed front then the black, yellow, white layer followed with the pink and then the white scalloped circle. The bee is also layered and is too cute. The card on the right is the card I made earlier this week and put on the blog and that is the project I took for everyone to make. The center card in the front is on a cream card base with a lavender embossed piece for the front and we used a scallop punch for the edge of that. Added cream ribbon and bow and 7 small butterflies and a larger butterfly is in the front. The larger butterfly is the only one that has 2 layers so it looks like movement on the front of the card. I have a photo of the spring behind the too cute bee and then a photo of the layered larger butterfly:


Here are the other cards:


The floral card on the left front had a white card stock base and we used a grape coloured card stock and then the white front card stock. We used ink from Stampin Up and the flower is also theirs as well as the matching punch. This card features the "stampin off" the edge of the card stock. The "Thinking of You" greeting is also a Stampin Up stamp. There is a pop dot behind the center flower and we finished that off with a pearl. The card to the right is a holiday card featuring pine cones and red Stickles. This card is all layers in the front. The card base is white and then I used the green card stock and then the white frames with pop dots. Some people used a red where I used the green card stock and one of the cards had the inside frame in green instead of white. So that card, like the floral, looks totally different depending on the colours you use. Both cards have classic designs that can be used over and over again.


This is the card that Cindy W had us make --- is it cute or WHAT??? Love Santa stuff... maybe because he and I share the same shape???? hahahahaa..... For this card the top collar is embossed and then we used black brads that are the shape of buttons and then we used shiny silver card stock squares for the buckle on his belt. "Merry Christmas" is cut into an oval. The card base for this card is also white card stock which really helps the red and black to pop.

Cindy W puts a lot of thought into our Shoe Box Swaps and I have only been to 4 of hers but I learn something every time... today tho she had a new idea . . when we go to the swaps everyone brings a completed card/project and all the parts for everyone else to make. The completed card/project is usually laying on the table with all the parts for all of us. Today Cindy had clear plastic frames from the dollar store and we put our completed projects in the frames --- WHAT A BRAINSTORM this is -- this way if 2 or more are working on the same card/project the completed one is on the table standing up and we can all see it and you do not have to worry about losing it in the pile of supplies or getting ink or glitter on it or anything... I stopped at the dollar store and picked up two frames for you to see. One has her card in it and the other is empty --- GREAT idea!


As you can see the plastic frame covers the front of the card and it is high enough that a couple of people can see it at the table while we were working. The frame on the left is a side view so you can see it slants back a bit and that is a good angle so you will not get glare on it.

LOVE the swaps!!!!! can't wait until next time and had fun with all the gals.... no boys allowed !! :9) TFL

Wednesday, August 15, 2012

MOO MOO the Cow Art Punch Drinking Straw

MOO MOO the Cow Art Punch UPDATE


Found these on Frenchie's blog.  Thanks, I can't wait to make them.

How to make a cow face with punch:
Owl Builder #118074
Blossoms Petals Builder #121808
Large Oval #119855.
Card stock White, Black and Pink Pirouette. Those stick are flavor thing to put in your milk and I found them at the groceries store by the dairy product. They have pink for strawberry flavor, Brown for chocolate and vanilla color for vanilla flavor so many of them. They are perfect to put in the kids lunch box.

To distinguish between the flavors, I change the cow's mouth.  Brown for Chocolate, pink for Strawberry, pinkish yellow for Strawberry Banana, a brown speckled for Cookies & Cream. 

Reindeer Noses and Grinch Pills

Reindeer Noses - fill a bag with Cherry Sours and use this topper on the bag and you have a fast and easy treat for friends and neighbors.


Fill your treat bag with green and red M&Ms and now you have a bag of Grinch Pills.  Too cute!


Grinch Pills

Grinch Pills --Free Scut File

You must realize Christmas is my favorite holiday, so I am going to be posting all sorts of ideas for your Christmas pleasure. 
 
I found this one thanks to a craft shop I went to in South Carolina. 


Right click on the image below to save. Then all you have to do is print!

August Card Club Pictures

Thanks Candee for providing the pictures of the cards we made during Club.


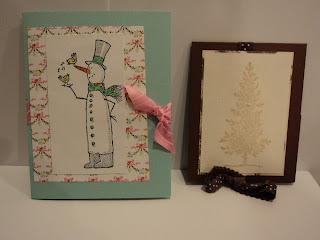
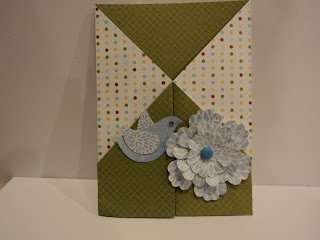
These are the photos of the cards we made Friday night for the monthly card club. The first photo has a card and then a gift card holder. We used the Snow Much Fun snowman set from Stampin Up for the snowman card. He is too cute -- we used markers to colour him and his birds. Then the gift card holder on the right is made using the Lovely As A Tree stamp set from Stampin Up. This is a one piece holder and it can hold a gift card or if you change the score lines it can hold a miniature bag of M&Ms or other candies. The last photos are of a card that is made with a 12" x 12" piece of card stock and you score that and then trim off the triangle piece. I used a double sided piece of card stock for the photo. The flower and the bird are from the Betsy's Blossoms stamp set from Stampin Up and I used SU Bashful Blue ink for that. I added a clear crystal for the eye for the bird and used a blue brad from the stash for the center of the flower. Used a flower punch and two smaller scalloped punches for the flower pieces.

Santa Card

It is that time of year when we all need to start working on our Christmas cards.  Here are the instructions for a cute SANTA card from Kathryn.  I cased this card for our Shoebox Swap this coming Saturday.  .

The Santa Card

Supplies: Red cardstock cut to A2 card front size (4.25″ by 5.5″) Black cardstock cut to 1.5″ by 4.25″ White or cream cardstock cut to approximately 3.5″ by 4.5″ (varies based on size of die) Scalloped oval die (I used the largest one in the Large Scallop Ovals set by Nestabilities) Embossing Folder (I used Cuttlebug D’vine Swirls) 5.5″ black ribbon 3 buttons, brads, or eyelets 1 “belt buckle” (I used a soda tab. You could also buy ribbon slides if you’re like me and don’t drink soda.) Sentiment stamp and ink if desired.
Cut your cardstock to the sizes listed above.
Cut a scalloped oval from the white cardstock. Cut the oval in half. Emboss the half oval.
Stamp a sentiment on the black cardstock if desired. Attach the black and white cardstock to the red cardstock.
Slide the buckle onto the ribbon. Attach the ribbon where the black and red cardstock meets. Wrap the ends to the back.
Punch or pierce three holes if using brads or eyelets. Attach the brads or eyelets or glue small buttons in place.
Attach the card front to a card base.


Isn’t that the cutest Santa ever!!! Thank you, Kathryn! Here are a few tips for playing along. If you don’t have the same Spellbinder die or Cuttlebug folder as Kathryn, don’t stress it! Part of the fun of Tutorial Tuesday is sharing ideas with others about what other products work in a similar way. Try alternative things for Santa’s beard if you need to. A scalloped circle or oval cut with a die-cutting system like Cricut might work, or you could cut a circle with some decorative edge scissors. Use a different embossing pattern or try heat embossing some stamped swirls with white or clear powder on your white paper. A swirly white patterned paper might also work, or how about some white felt? I love the idea of the soda tab but I also have some ribbon buckles or “slides” There are also buckle punches out there, or if all else fails, you could cut a buckle out of gold or silver paper in a rectangular shape that is just a little wider than your ribbon. Adapt, improvise, overcome and share your Santas and ideas here!

Thursday, August 9, 2012

That's a Wrap

Found this idea on craftingwithsue.blogspot.com and thought that I should share it with everyone.


Creating decorative envelopes from wrapping paper.


For those of us who make our own cards, finding the perfect envelope, both in terms of size and color, can be a bit of a challenge. In the past I have used patterned paper from the craft store but that can get very expensive if you are making a lot of envelopes. Another problem with those papers is that you are limited by size. Usually 12" x 12" is as large as you can go. I know some of the Martha Stewart papers come in sizes larger that 12 x 12, but they are so expensive that I do not consider them a suitable, or maybe I should say, "economical" choice for envelope making.

To make envelopes, I want pretty colors and beautiful patterns. But most importantly, I want nice, thick, large paper so that my envelope sizes will not be limited and my envelopes will be strong and sturdy. My solution.... Wrapping Paper! Now, the quality of the wrapping paper you use is the key! Not any old roll of wrapping paper will do! There are a lot of flimsy wrapping papers out there and those will not be suitable for this project as they can be easily torn. When shopping for wrapping paper for envelopes, you will want to look for thick strong paper. My favorite brand is the one you see in the picture below and these can be found at Hobby Lobby. They are $7.99 a roll, but of course I waited until they were on sale and picked them up for half the price!


You will start by cutting your wrapping paper into a square to suit the size of the envelope you are making. Here I was making 5.75 x 8.75 envelopes to fit a half-fold card, so I cut my paper just slightly larger than that.


Then you can use your envelope template, or do as I did below and used an old envelope as your template, and trace around the edges of the envelope.


Once you have traced the entire outline, you can then cut it out.


Next you fold it and add your adhesive and you are finished!


This is a super quick and economical way to create beautiful patterned envelopes to match the various card sizes in your collection.


Sunday, August 5, 2012

What happens When you Get Adhesive on your Paper

How many times do you get a little bit of adhesive on your paper or card stock and don't know how to get it off.  SU sells an eraser and it works.  Simply use it and presto the adhesive is gone.

Adhesive Remover  103684 $3.50

Saturday, August 4, 2012

No More Tearing Your Paper

How many times do you adhere something only to have to remove it because it was not straight.  What usually happens to me is I end up tearing the paper.  Well NO MORE...I learned a tip today that when this  happens, get out your heat gun and apply heat to the back of the paper and it will melt the glue.  Slowly strart removing your paper.  Yea no more torn paper and having to start over again.  Hope this TIP help.

Friday, August 3, 2012

Christmas Card Class

Christmas Card Class

Get Your Christmas Cards Done Early This Year!

Were you ready to pull your hair out last year getting ready for the holidays. Did you find yourself not having any cards ready? Did you run out of time and have to go and buy a box of Christmas cards to mail? Or were you so busy that you didn’t mail any Christmas cards at all ?

If this sounds like your life last year, why not come to my

Christmas Card Class

I will be holding a Christmas Card Class for the next 5 months. Attend one or more of my Christmas Card Classes and get your cards done before November is over! At each class you will make 10 Christmas Cards complete with envelopes: 2 each of five different designs! I will have 10 designs to pick from.

Why attend?
•To get your cards in the mail before December.
•You won't have to worry about what kind of card you will make or if you have the stamp set, ink, card stock or embellishments. Everything will be done for you! I will have the card designed, cut the card stock and lay everything out for you – all you do is stamp, punch and assemble!
•All card supplies are included in the class fee of $30 (please bring your favorite adhesive and paper snips)
•If you purchase a minimum of $25 in Stampin-Up product the night of the class, you will get half of your class fee back!

Class Dates:

August 26th at 2:00 pm

September 23rd at 2:00 pm

October 28th at 2:00 pm


For those of you, who have alot of cards to make, I am offering a discount.


First class is $30

Second class is $25

Third class is $20

Fourth class is $15


If none of these dates or times are convenient for you, I may be able to accommodate you at your preferred date. Let's get in the Christmas spirt and celebrate Christmas with all of our hair.

August Shoebox Swap

Our next Shoebox is Saturday 8/18 at 1 p.m. 

A shoebox swap is where you bring one full card (not a card front) which will be made ahead and all supplies (pre-cut and ready to assemble), stamps, inks, tools, etc., needed to make the other cards. Each person sets up their station for stampers to be able to make your card, and after you have set up you go to the other stations and make those cards. The number you make depends on how many are going to attend. I will send that information out when the event registration ends. RSVP's will end 5 days before the swap so you have time to prepare your swap.

Wednesday, August 1, 2012

Have you been thinking about joining Stampin' Up! and my team?

Have you been thinking about joining Stampin' Up! and my team? Well this is the month to do so!

Besides your Starter Kit being only $99 and totally customizable, all new demonstrators will receive a FREE Howl-o-ween Printer's Tray project kit!
This boo-tiful kit contains all the bits and pieces to create a super spooky Halloween decoration (except ink) - you won't want to miss out on this exclusive offer!


Tool Tip

Tool Tip

Have you been frustrated when making a flag end on a strip of cardstock? I know I was until I started using this technique! Now instead of using the scissors to cut a V-shape in the end of the
cardstock I use a square punch.

It is easy to do as long as the strip of paper is not any wider then the diagonal measurement of the punch. Slide the strip of cardstock into the punch on an angle as shown in the picture. Be sure the edges of the cardstock are all lined up evenly before punching. With just a wee bit of care when punching you will get a precise flag end each time! In this case the cardstock was cut slightly less then 1 3/4" wide to fit a 1 1/4" square punch (119865).

Try this technique and you will be pleased with how easy it is to get a professional look every time!

What is the new paper called Core'dination? How do I use it?

Stampin' Up's regular cardstock has a solid color throughout the paper, so if you cut, rip, or tear it, the inside color is the same as the outside. The new Core'dination paper comes in three exclusive Stampin' Up! colors (on the outside) with a coordinating monochromatic color on the inside layer. It comes in a 12 x 12 size, so it's great to add to your scrapbook pages. The Core'dination cardstock has one smooth side and one textured side. So, you can stamp on the smooth side like normal paper. To reveal the coordinating paper underneath:
1. You can emboss the cardstock with an embossing folder or a texture plate. Then sand the embossed part to show off the underneath color.
2. You can also tear the edge to show off the core or simply sand the edges.
3. You can use your Simply Scored scoring tool or diagonal plate to create a pattern and then sand the raised scored lines.
4. Pull out your old Stampin' Up! Crimper and crimp it.
5. Crinkle the paper by hand: wad up the paper, smooth it out, and sand the ridges.
6. Put chipboard words or images under the card stock and then sanded top of cardstock by pressing down. This is like dry embossing. It will reveal the pattern of the chipboard.
I hope this gives you a good start on how to use the new Core'dination Cardstock. Remember to make clean up easy, use the Core'dinations Dust Buddy to pick up all your sanding pieces.

Tax Free Weekend


Stock Up on Stampin' Up! Tax Free
Friday, August 3rd to Sunday, August 5th
 
 
Don't miss your chance to stock up on all of your basic stampin' & scrappin' products TAX FREE!  Just email me at nccindywalker@gmail.com or call me at 919-585-6667with your order by 12:00pm on Sunday, August 5th.

ALL orders submitted to me by 5:00pm, Friday, August 3rd will recieve FREE SHIPPING as well as be TAX FREE!  This extra savings is only from me because I value your business and think you deserve a great deal!
 
The following items are tax-exempt during the North Carolina sales tax holiday:
Number    Description                            Price
 100425     2-Way Glue Pen                    $3.50
 104332     Snail® Adhesive                   $6.95
 104331     Snail Refill                             $4.50
 104294     Sticky Strip                            $6.95
 104430     Stampin' Dimensionals        $3.95
 103683     Mini Glue Dots                      $4.95
 103579     Paper Snips                          $9.95
 103179     Craft & Rubber Scissors     $19.95
 108360     Craft & Paper Scissors        $29.95
 101879     Watercolor Pencils              $19.95
 105021     uni-ball Signo® Gel Pen      $3.95
 102845     Blender Pens                        $9.95

various    Stampin' Write® Markers     $3.50
 119700     Subtles (10)                           $28.95
 119701     Regals (10)                            $28.95
 119702     Brights (10)                           $28.95
 119703     Neutrals (8)                           $22.95

                Stampin' Crayons
119802     Subtles (10)                           $16.95
 119803     Regals (10)                           $16.95
 119804     Brights (10)                           $16.95
 119805     Neutrals (10)                          $16.95

 110755     Multipurpose Liquid Glue     $3.95
 104045     Anywhere Glue Sticks           $3.95
 123002     2011-2013 In Color Stampin' Write Markers  $14.95
 128978     Silver Stampin' Dazzle Marker  $3.50
 128979     Gold Stampin' Dazzle Marker  $3.50

Cleaning out our Craft Room Sale

The Sale went great last Saturday so we are doing it again this Saturday from 10 - 2.  Plenty of stamp sets left, ink pads, loads of paper, punches, etc.  Bring your friends.  Anyone that brings a friend can get a bag of paper free with a $10 purchase.

August Card Club

It is August, can you believe it.  Before we know it it will be Christmas.  Just a reminder Card Club is Friday nite 8/10 at 6 p.m.  Let me know if you are coming and if you are bringing a guest.  Need to get busy thinking about cards for us to make.

My Digital Studio 2

WOW!!!!!!

I can't be more excited, I installed it this morning and already am in love with it.  The best thing I have found so far is you can change your stamps to multiple colors.  This is great no longer are you stuck with one color.  It is as good as stamping using a marker to color the individual elements of the stamp. 

If you don't have MDS then why not try the FREE MDS2 Trial for 30 days.