| ||||||||||||||||||||||||||||||||||||||||||||||||||||||||
Monday, April 30, 2012
Accessories Transition

We have a STAR in our group
Just found out that Candee Porter had two of her items on
Splitcoast chosen as favorites of the week! A BIG CONGRATULATIONS TO CANDEE!
The first one is a card that she used a pencil eraser on and the second is the Shoe Box Swap #2 for this Saturday that she is bringing for us ALL to make.
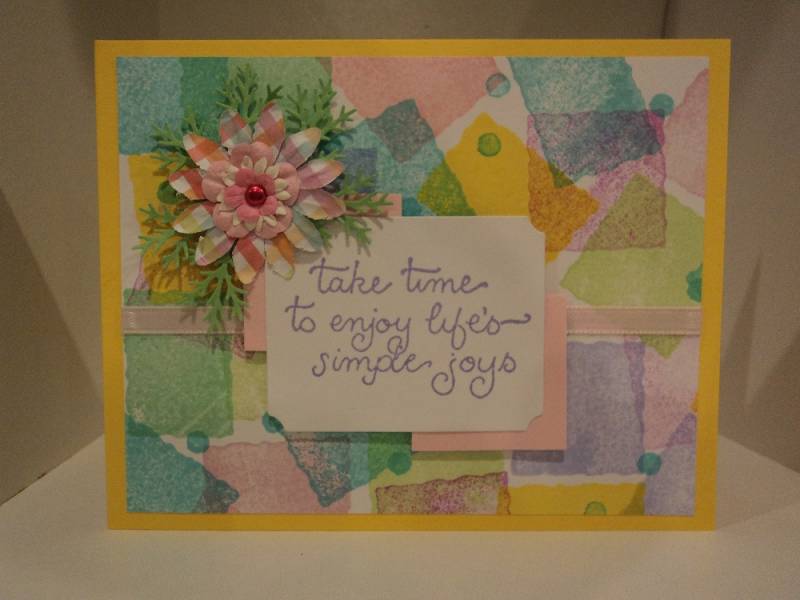
Used Little Shapes stamp set from SU and various inks on the square and rectangle stamps. This is stamped on white card stock. For the turquoise little circles I used a pencil eraser and dabbed it on the ink pad and put it randomly on the stamped piece. Used a greeting stamp from JRL Designs and lavender ink. Use the Large Label die from Spellbinders in the Cuttlebug for that. Used a square punch for the pink pieces behind the label piece. Used a plaid flower and smaller flowers for the flower piece. Sprigs were made with the Martha Stewart punch. Pop dots were used behind the label for dimension. Ribbon is from the stash.
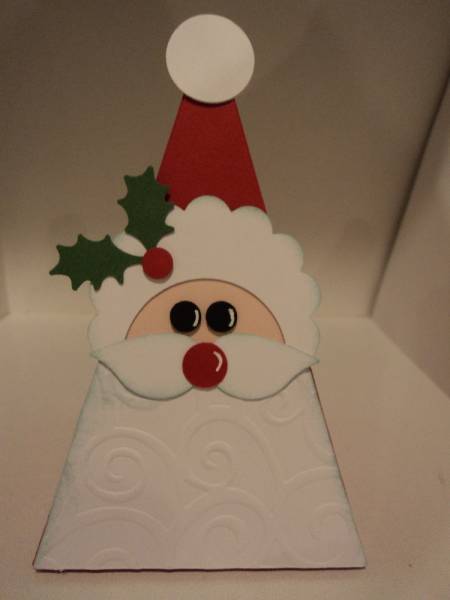
Petal cone die was used to make Santa. Used circle punches and also the Martha Stewart holly punch for the holly piece. Used the D'Vine Swirls Cuttlebug embossing folder for the beard. Used light blue ink and sponged the edges of the beard, hair, and the mustache. His mustache is made using the wings from the 2 Step Bird Punch. Used a white Signo pen for his eyes and nose.
The first one is a card that she used a pencil eraser on and the second is the Shoe Box Swap #2 for this Saturday that she is bringing for us ALL to make.
Used Little Shapes stamp set from SU and various inks on the square and rectangle stamps. This is stamped on white card stock. For the turquoise little circles I used a pencil eraser and dabbed it on the ink pad and put it randomly on the stamped piece. Used a greeting stamp from JRL Designs and lavender ink. Use the Large Label die from Spellbinders in the Cuttlebug for that. Used a square punch for the pink pieces behind the label piece. Used a plaid flower and smaller flowers for the flower piece. Sprigs were made with the Martha Stewart punch. Pop dots were used behind the label for dimension. Ribbon is from the stash.
Petal cone die was used to make Santa. Used circle punches and also the Martha Stewart holly punch for the holly piece. Used the D'Vine Swirls Cuttlebug embossing folder for the beard. Used light blue ink and sponged the edges of the beard, hair, and the mustache. His mustache is made using the wings from the 2 Step Bird Punch. Used a white Signo pen for his eyes and nose.
Sunday, April 29, 2012
Teapots Using Petite Purse Die
This die has no end. Here is a teapot made using it.

I used two of the cut out petite purses back to back. I realized after I loaded the pic that you couldn't tell, but it has a pocket on each side. I just used sticky strip to put the two together so that you could put a teabag on one side and a packet of sweetner on the other. Use the scalloped Petite Penants Builder punch for the spout.
And a watering can
Magnetic Book Marks

First, you need the Two Tags Die, some DSP or CS and magnetic sheets. Anyway, my measurements weren't exact, but I cut strips of DSP to 2" x 4". I don't like to waste paper, so this was just a tad bigger than the die. You might want to make your measurements a bit bigger. :) I cut the magnetic sheets down to 2" x 2-1/8" and then adhered the magnetic sheets to the DSP making sure to leave at least 1/8" in between the two magnets so that there's room to fold. I just eyed this, so it wasn't exact. Then place the entire thing on your die & run through the Big Shot. Decorate as you want - the smaller scallop punch fits perfectly with this die! :)
Friday, April 27, 2012
Blossom Triple Layer Punch is being Discontinued
Don't miss out on this punch. It can be used for multiple items. Here is a fellow SU demonstrator video on using this punch.
http://www.stampinconnection.com/video/stampin-up-triple-layer-punch
http://www.stampinconnection.com/video/stampin-up-triple-layer-punch
Pansies Using the Butterfly Punch
Here is a video that one of my fellow SU demonstrators made on how to make pansies with the butterly punch. Enjoy
http://www.stampinconnection.com/video/butterfly-punch-pansy
http://www.stampinconnection.com/video/butterfly-punch-pansy
Petunias with The Butterfly Punch
As many of you are aware the butterfly punch being discontinued. This punch is not just for butterflies. You can make butterflies (of course), flowers and even wreaths and no telling what else you can make.
Here is a video that one of the SU demonstrators made on how to make Petunias with the Buttefly Punch. Watch it an enjoy.
http://www.stampinconnection.com/video/paper-petunias
Here is a video that one of the SU demonstrators made on how to make Petunias with the Buttefly Punch. Watch it an enjoy.
http://www.stampinconnection.com/video/paper-petunias
Wednesday, April 25, 2012
May Shoebox Swap
Our next Shoebox Swap is Saturday, May 5th at 1p.m. Last time was so much fun. Come join us on then 5th.
If you have never been to a SBS, here is what it's about:
A shoebox swap is where you bring one full card (not a card front) which will be made ahead and all supplies (pre-cut and ready to make), stamps, inks, tools, etc., needed to make the other cards. Everyone sets up their station for stampers to be able to make your card. After you have set up your station, you go to the other stations and make those FANTASTIC cards that others have brought
If you are interested in attending, please send me an email.
I will send information out on many are attending when I receive everyone's RSVP. I will give you a several days notice before the swap so you can get your stuff together.
Get creative and let's have a great Saturday afternoon playing with ink.
You can use any product or make anything (it doesn't have to be a card, it can be a tag, gift item, etc.)
There will be a prize for the best card (you will be the judges).
Below is what Candee will be bringing to the swap. She is so creative. Just thought I would tease you. She'll give you directions on Saturday.


Wednesday, April 18, 2012
How you extend the Modern Label Punch so that the longer sentiments can fit.
Step 1: Using a ruler, measure the width from the widest part of the Modern Label Punch.
In this case the width is almost 5/8" so I chose to go with 4/8" which is
1/2":
Step 2: Cut out a piece of cardstock 1/2" x the length desired for
your sentiment and stamp your sentiment:
Step 3: Flip the punch so that the backside is facing you and
insert your piece of cardstock on one end through the back. You might have to
turn your cardstock piece 180 degrees and then slide it to the end and turn:
Step 4: Punch the end of your cardstock and repeat for the other end.
You won't have the curved center but will have the decorative ends for your sentiment. You can adjust this for any length of sentiment desired:
You won't have the curved center but will have the decorative ends for your sentiment. You can adjust this for any length of sentiment desired:
Sunday, April 15, 2012
How to do Faux Leather
 Here's how a fellow demonstrator did the faux crocodile technique on the new Purse Die!

She used chocolate chip CS on this one with gold brads and punched 5/8 inch circles and embossed those too and added little gold brads through the bottom to make this one- bit of a pain in the butt to add the brads on the bottom and to versamark this one (It words best to use the versamarker to ink it up after to glue the piece on the corner otherwise the embossed circle gets all cracked and ugly. Certainly not a demo or make and take project!)
NOW FOR THE INSTRUCTIONS ON DOING TEH FAUX CROCODILE TECHNIQUE.
Diecut the Petite Purse in any colorstock of your choice.


Versamark the area you want to have the faux crocodile. You could use the
versamark pen or dab the area on the pad like this if it is a big area.
This is what it looks like.
Put clear embossing powder over the versamarked area.
Scratch a design like a crocodile- free form, using a scoring tool, a
toothpick or a old dried up pen. Toss the clumped embossing powder that forms on
top - do not put it back into the clean powder. Heat set it as shown.
It words for all color cardstock beautifully so try it out!
Petite Purse Variations
Petite Purse Variations using DSP - This is a CASE by Lynda
 There are lots of ways you can play with the Petite
purse die especially using the great DSP choices we have. I did a fussy cut a
piece using the Sale-a-bration Everyday Enchantment paper so it would be aligned
in the middle and it is very simple but pretty. I tucked the handles on the
inside for this one but you can have it out and decorate that as well. Or
decorate the front panel only and use a decorative filigree brad like the one I
did on the pacific blue bags using the delightful Summer smooches
DSP.
There are lots of ways you can play with the Petite
purse die especially using the great DSP choices we have. I did a fussy cut a
piece using the Sale-a-bration Everyday Enchantment paper so it would be aligned
in the middle and it is very simple but pretty. I tucked the handles on the
inside for this one but you can have it out and decorate that as well. Or
decorate the front panel only and use a decorative filigree brad like the one I
did on the pacific blue bags using the delightful Summer smooches
DSP.Change out the handles with the Dotted scalloped ribbon and decorate with all the pretty brads, Pearls, rhinestones, buttons, ribbons.... Bring out all those doo-dads that you have been hoarding and use some of it for this. Fill it with hershey' nuggets (fits 5 - four on the side and one on top) or Ghiradelli square chocolates (fits 3 perfectly!) Do the Stampin Up marketing people know us or what?
I tell you, this is the EASIEST little gift I have ever made! Now if I the candy can make it out of this house ........... Take some time to play today!


Purse Tote Using New Purse Die

This is a picture of more of what you can do with the new Sizzix/Stampin Up
Petite Purse die. I forwarded a picture of what Katy Pope had made
with her new die to Candee P and she went from there.
Way to go Candee. I love the way you think out of the box. This is how she said she did it:
"I laid one cut out purse on top of the other and marked
where I wanted to use the oval punch for the top of the tote. Before you punch
the oval be sure to trim the tab on the top of the piece off as you will not
need that. Then I used the oval punched and punched the oval in both together.
Then I laid the purse pieces back to back on top of each other with double sided
tape between them to make them as one. Then I put the tape on the sides of the
purse. Once all taped together you have two purses back to back. Add candies and
a bow and it is done. Not only are the purses/totes cute but they go together
rather quickly! "
April Card Club
Friday's card club was so much fun. One of the things we did was make purses using the new purse die; however, one of my customers kept hearing the UPS truck and announcing he was here with our order. Strangely enough the order hadn't been placed yet, but she was so excited about the new Purse Die, that she knew it would show up anytime. Well to make her happy as I try to do with all of my stamping friends, I let her take the die home so she could make some purses as she anxiously awaited hers to arrive. Here's a pic of some of the purses she made:

She did such a good job on instructions, here they are. Candee, hope you don't mind me sharing.
Used the new purse die from Sizzix for Stampin Up for these purses. They will hold the miniature candy bars and the nuggets. The dotted purse I used double sided paper for. The black and white purse is white card stock that has a black flocking on it. The red purse is flocked paper from Hobby Lobby and the coral purse I used textured paper for. Way cute and fun to make. Tips I learned: After it is cut out use a pencil on the wrong side of your handle to mark the hole for the brad to hold the handle on the purse. I used a small hole punch for that. I also used a pencil to mark the side of the purse for where the handle will be. I then used the hole punch for that as well. I cut out all the purses with the die then marked and punched the holes for the brads for the handles. Then I used the tape for the purse sides. Then used a small flower punch for the flowers on the front of the purses. Made these four in less than an hour that way. Used different papers to show this can be casual or dressed up. At the stamp club Cindy W had embossed one of the purses -- very versatile looks for a cute purse ... was hoping to be able to use a lot of scraps for it but the die cuts the purse in one piece and it will take a larger piece than scraps. Bigger than the other purses I have made but it holds more chocolate so that is a good thing !!!
Again, before I could post pictures of what we did, Candee already posted it on her blog, so I'm sharing her pics and comments. Again Thanks Candee:

The card in the front in the blue we used MDS Summer Smooches digital papers and stamps and made a
Mother's Day card. We used a small circle punch and punched out circles from
the printed paper for the 'flowers' in the blue vase. Then we cut apart
the dark blue Modern Label behind the "Mother's Day" greeting to look as though
the darker is a longer piece. I am beginning to love MDS. I have decided if i want a stamp set that I may use only once during the year (i.e. Valentine's Day, Easter, etc.), I will buy it digitally. The same thing applies to the paper.
For the Happy Birthday card on the left we used
the Pennant Punch for the hanging flags/banners. We used twine and we used star
punches for the stars. There are pop dots behind the pennants for dimension. For
the red, yellow, and light blue pieces we used a corner rounder punch. Bright
and cheery and possibilities are endless !
For the golden/pink floral card on
the right we used the crayon resist technique. We all used the same supplies and
each of our cards look so different---which is what creativity is all about. Fun
technique and the floral stamp on this card is the same stamp on the card
standing in the back---we coloured that one with markers--so as you can see
different techniques for the same stamp can make it look very different.
As
usual we did a lot of detail things that add up to four really nice cards -- and
skills we can use on other projects !
Retired List
SU just announced their retired stamp set list. You can order these items until May 31st or until the supplies last.
Excel spreadsheet
PDF document
The retired accessories list will be published April 25th.
Excel spreadsheet
PDF document
The retired accessories list will be published April 25th.
Thursday, April 12, 2012
Shoebox Swap
Our next Shoebox Swap is Saturday, May 5th at 1p.m. Last time was so much fun. Come join us on then 5th.
If you have never been to a SBS, here is what it's about:
A shoebox swap is where you bring one
full card (not a card front) which will be made ahead and all supplies (pre-cut
and ready to make), stamps, inks, tools, etc., needed to make the other cards.
Everyone sets up their station for stampers to be able to make your card. After you have set up your station, you go to the other stations and make those FANTASTIC cards that others have brought
If you are interested in attending, please send me an email.
I will send information out on many are attending when I receive everyone's RSVP. I will give you a several days notice before the swap so you can get your stuff together.
Get creative and let's have a great Saturday afternoon playing with ink.
You can use any product or make anything (it doesn't have to be a card, it can be a tag, gift item, etc.)
There will be a prize for the best card (you will be the judges).
Monday, April 9, 2012
Stampin' Up! Clearance Rack
New items have been added to the clearance rack. Let me know if you would like to buy anything.
Go to my SU site, http://www.stampinup.net/esuite/home/cindywalker/
- click on Products
- click on Shop Now
- click on Clearance
Sunday, April 8, 2012
Crayon Resist Technique
Have you ever done the Crayon Resist Technique. Wow, is it easy and comes out fantastic. We will be doing this in card club this coming Friday.
Here are a few instructions, but I am not going to post the card because I want you to wonder how it looks.
Places where the crayon was used will stay white. Fantastic looking card. Can't wait for you to see it.
Here are a few instructions, but I am not going to post the card because I want you to wonder how it looks.
- Glossy paper #102599 (it works with regular card stock) but it works much better with glossy
- White Crayon (kids crayon)
- StazOn ink
- Classic ink for the sponging (on this card I use Pear Pizzaz, Regal Rose and So Saffron)
- Sponge for dabbin
- a detail stamp (we wilI use Elements of Styles )
- stamp with StazOn on glossy paper
- add your crayon where you want it to stay white then color with sponge or marker
- When all done coloring take a rag and rub your card
Places where the crayon was used will stay white. Fantastic looking card. Can't wait for you to see it.
Friday, April 6, 2012
April Card Club
April's card club will meet on Friday 4/13 at 6 p.m. Here is one of the cards we will be making.


I will be so glad when I can master my camera, so I can take good pictures.
Tuesday, April 3, 2012
Operation Write Home
If i am like so many other stampers, I usually make more than one card of the same design (just in case I need it someday). Well my box runneth over. I have so many cards and no place to mail them.
I remember hearing about Operation Write Home. Here is their Mission Statement and something about the organization. Go to their website and read about them and the comments from our heroes who have been the recipients of our good work. My prayers go with them.
Supporting our nation's armed forces by sending blank handmade greeting cards to write home on, as well as cards of gratitude to encourage them.
This merry band of thousands of cardmakers is made up of Americans - and citizens of other nations too - who care about our military, and want to support them through creativity and encouragement. Crafters of all ages and levels of experience have participated since 2007...and in the spring of 2010 we passed one MILLION cards!
Care packages filled with hundreds of handmade cards are sent to our contacts, restocking every 6-8 weeks, and are sent in time for the long journey back home to loved ones. Each box is packed with great care, alternating styles, colors, and cardmakers from all over the USA, creating "eye candy" for heroes who see only khaki around them. The topper on each box is a plastic bag filled with 20-30 letters from adults and children across the country, letters handed out especially to those in need of a positive word from the homefront.
Boxes are shipped through every week of the year, so join us anytime in sending your beautiful creations to help our heroes keep in touch with home!
I remember hearing about Operation Write Home. Here is their Mission Statement and something about the organization. Go to their website and read about them and the comments from our heroes who have been the recipients of our good work. My prayers go with them.
Operation Write Home Mission:
This merry band of thousands of cardmakers is made up of Americans - and citizens of other nations too - who care about our military, and want to support them through creativity and encouragement. Crafters of all ages and levels of experience have participated since 2007...and in the spring of 2010 we passed one MILLION cards!
Care packages filled with hundreds of handmade cards are sent to our contacts, restocking every 6-8 weeks, and are sent in time for the long journey back home to loved ones. Each box is packed with great care, alternating styles, colors, and cardmakers from all over the USA, creating "eye candy" for heroes who see only khaki around them. The topper on each box is a plastic bag filled with 20-30 letters from adults and children across the country, letters handed out especially to those in need of a positive word from the homefront.
Boxes are shipped through every week of the year, so join us anytime in sending your beautiful creations to help our heroes keep in touch with home!
Monday, April 2, 2012
Does a Girl Have Too Many Purses
If the answer is no, then you need to take a look at some of these purses my fellow SU demonstrators have made. This is one of the cutest things I have ever seen. My order came in and I've been making purses. So cute! We will be doing one during card club this Friday.
It is made using the Summer Smooches


It is made using the Summer Smooches
Petite Purse Bigz L Die, item number 125606 selling for $32.95.
You can purchase this April 1st-30th, during the new catalog sneak peek! If you don't get it then, you'll have to wait until the new catalog premieres on June 1st.
You can purchase this April 1st-30th, during the new catalog sneak peek! If you don't get it then, you'll have to wait until the new catalog premieres on June 1st.


Subscribe to:
Comments (Atom)